Hidden Flag, XORing Data, HSCTF6 Writeup
Description:
This image seems wrong.....did Keith lose the key again?
We first get a file with png extension which is unable to open as a png file.

Then we output the hex data, and we can find that there are no png signature '89 50 4E 47 0D 0A 1A 0A'.

Let's review the description:
This image seems wrong.....did Keith lose the key again?
We could consider using XOR. First we could try 'again' as the key.

No signature. The key seems wrong.
So, we show the hex data of chall.png one more time. As we can see that 'key is invisible' is shown.

Let's try the key 'invisible'.

We got it! Just output the data as a png file.


Got the flag.
- eog command: Eye of GNOME Image Viewer
拡張機能の仕組み
拡張機能とは、ブラウザのもともと持っている機能を追加または削除するオプションソフトウェアです。
ブラウザの拡張機能は、通常サードパーティが作成するので、自分でも作成することができます。
拡張機能は、ユーザが自主的にインストールして使用するのが一般的で、ユーザが知らないうちにインストールされてしまうこともあります。
ブラウザの拡張機能は、もともとセキュリティについて考慮せずに開発されたものです。そこで、拡張機能を介してブラウザに保存されているユーザの機密情報の漏洩、特権API、ユーザが使用するOSにアクセスするようなリスクが挙げられます。
ブラウザの拡張機能を実装する際に使えるプログラミング言語はさまざまですが、もっともよく知られているのがJavaScriptです。
Dockerを使ってみた(Kali Linux)
こんにちは、Marsです。
最近、Dockerというものが非常に流行っていると多くの方がご存知だと思いますが、
この記事では、Dockerについて簡単にご紹介し、インストール手法について紹介したいと思います。
まず、Dockerとは何でしょうか。
Wikipediaでは、
「Docker(ドッカー[2])はコンテナ型の仮想化環境を提供するオープンソースソフトウェアである[3]。VMware製品などの完全仮想化を行うハイパーバイザ型製品と比べて、ディスク使用量は少なく、仮想環境 (インスタンス) 作成や起動は速く、性能劣化がほとんどないという利点を持つ。」
と言っています。
まずは、コンテナ型、ハイパーバイザについて説明しながら、Dockerの仕組みをざっと説明します。
知っている方は適宜読み飛ばしてください。(笑)
- コンテナとハイパーバイザ

↑
コンテナとは、これです笑
ふざけんな!と言われるでしょうけど、こういうコンテナをたくさん積み上げた状況を考えましょう。

それぞれのコンテナの中には木材、プラスチック材、飲料水、石けんなど、いろいろなものがあるとしましょう。
こうしていろいろな製品、材料の容器として使われるのがコンテナです。
ではここでのコンテナ型とは何かというと、現実世界ではコンテナとは同じようなもので、さまざまなプログラミングコードの容器として使われます。
イメージとしては、こんな感じです。

Image Resource:
https://www.docker.com/resources/what-container
一つのアプリケーションをコンテナ化して使います。公式では、このように解釈されています。
A container is a standard unit of software that packages up code and all its dependencies so the application runs quickly and reliably from one computing environment to another.
コンテナは、ソフトウェアの一つの標準的なユニットとして、コードおよびそれに依存するものをパックすることによって、実行が早くて信頼できる環境で動作できることが実現されます。
Reference:
https://www.docker.com/resources/what-container
コンテナ化されたアプリケーションは、仮想マシンで動くアプリケーションと比べ、実行が早い仕組みになっています。
その理由は単純に、仮想マシンでのアプリケーションを動かすには、基盤としてさらにハイパーバイザ、OSが必要だからです。

Image Resource:
https://cn.teldevice.co.jp/column/10509/
インフラ環境の上にホストOSがあって(今使っているパソコンのOS)、その上にハイパーバイザ(仮想マシンで仮想化を行う制御プログラム)を載せて、さらに仮想マシンにOSをインストールしてはじめてアプリケーションを実行することができます。
つまりホストマシンは、仮想マシンの制御プログラム、仮想OS、アプリケーションを同時に実行しなければなりません。
それに対して、Dockerは、自分のパソコンのOSにDockerエンジンを使えばコンテナ化されたアプリケーションを実行することができるので、仮想マシンと比べて断然CPUとメモリの使用率が少なくて自然にアプリケーションの実行が早いのです。
さて、Dockerのインストールに入ります。こちらの環境はKali linuxを使用しています。
- Step 0:
パッケージリストを更新する。
sudo apt-get update
- Step 1:
もし古いバージョンのDockerをインストールしていれば、以下のコマンドでアンインストールすることができます。
sudo apt-get remove docker docker-engine docker.io
- Step 2:
インストール。
sudo apt-get install docker-ce
- Step 3:
インストールが成功しているかどうかを確認します。
docker run hello-world
インストールが成功して、Dockerが使用可能の状態であれば、以下のメッセージが表示されるはずです。
Hello from Docker!
This message shows that your installation appears to be working correctly.
- Step 4:
Dockerエンジンは、Docker本体ともいえる、コンテナ・イメージの管理・実行を行うツールです。
つまり、Dockerを使うには、イメージが必要です。そのイメージとは、Docker用のとある種類のOSのイメージです。
例えば、centosのイメージを使用したければ、以下のコマンドを実行すれば良いです。
docker pull centos
実際にわざわざイメージをインストールせず、dockerにイメージの名前(例えばcentos)を指定してDockerを起動をすれば、
そのイメージが存在しない場合は自動的にイメージファイルをインストールしてからDockerを起動します。
- Step 5
Dockerを起動します。
起動が成功すれば、Dockerで制御する仮想システムを使用できます。
また、ポート番号を指定して実行したい場合は、 以下のようにコマンドを実行します。
docker run -p 8080:80 nginx
では、仮に今Dockerfileが与えられて、Dockerにサーバのように機能にてもらいたいとしましょう。

ここでは、2019年のHarekazeCTFのソースコードを例に説明します。
https://github.com/TeamHarekaze/HarekazeCTF2019-challenges/tree/master/baby_rop/server
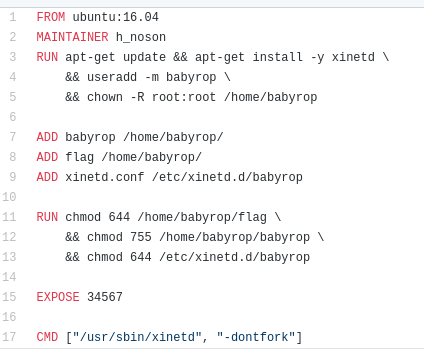
Dockerfileの中身:

Docker内にNetcatサーバを立てて、自分のパソコンのOSから接続したいです。netcatを使用できるようにするまでは、筆者はかなり苦労しました。
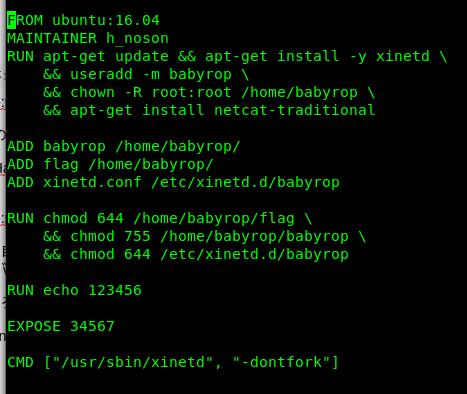
Dockerfileの設定として、ubuntuのバージョン16.04がベースとなっています。しかし、ubuntuの中にはnetcatがデフォルトのツールとして入っていません。
そこで、Dockerfileの5行目の一番後ろに\を入れて、6行目を以下のように追加します。
&& apt-get install netcat-traditional

この状態でDockerイメージをビルドします。
$ docker build -t babyrop102 .
(注意:一番後ろに点(.)を入れないとエラーが出る)
好きな未割り当てのポート番号でDockerイメージを起動します。
docker run -p 6666:6666 -t babyrop102 nc -l -p 6666 -e /home/babyrop/babyrop
(注釈:
docker run -p 6666:6666 -t babyrop102 nc -l -p 6666 -e /home/babyrop/babyrop
の前半部分「docker run -p 6666:6666 -t babyrop102」は、babyrop102という名前のDockerイメージをローカルホスト及び外部ホストともにポート6666で実行することを意味します。後半部分にbabyrop102という環境の内部で実行したいコマンドをくっつければDockerイメージbabyrop102の内部でコマンドを実行することができます。
つまり、
babyrop102という名前のDockerイメージをローカルホスト及び外部ホストともにポート6666で、「nc -l -p 6666 -e /home/babyrop/babyrop」というコマンド実行する、ということです。
)
いざ接続!
nc localhost 6666
What's your name? a
Welcome to the Pwn World, a!
CTFの環境を再現することができました。
一夜漬けする甲斐があった><
ちなみに、先ほど作ったDockerのイメージファイルは、/var/lib/docker/image/overlay2/imagedb/content/sha256の下に保存されています。それを共有することで、環境構築時間ほぼ0で、同じファイルを同じ環境で実行することができます。ファイルのハッシュ値は、docker imagesで確認すると良いでしょう。
また、より簡単に実行する方法としてdocker-composeを使う方法があります。
この方法は、dockerfileを使わず、docker-compose.ymlファイルを設定ファイルとして使います。
もちろんDockerfileもdocker-composeも、自分で書かなければいけません。今回はDockerfileが提供されているので、それを使いました。
docker-composeの使用方法の手順の詳細は、公式webページに書いています。↓
Get started with Docker Compose | Docker Documentation
- 追記: エラー解消:
Error1:

解決法:
systemctl start docker

- 参考:
A note for reading 'Mastering Modern Web Penetration Testing', Chapter 1
Chapter 1
SOP(Same-origin policy)
Explanation by Wikipedia:
In computing, the same-origin policy is an important concept in the web application security model. Under the policy, a web browser permits scripts contained in a first web page to access data in a second web page, but only if both web pages have the same origin. An origin is defined as a combination of URI scheme, host name, and port number. This policy prevents a malicious script on one page from obtaining access to sensitive data on another web page through that page's Document Object Model.
Reference:
Same-origin policy - Wikipedia
Applicable Scope:
Same-origin policy can protect JS, cookies, AJAX, Flash, and so on. Data stored inside localStorage is also governed by this policy. That means, we can't get the data from another domain through JS, JSON, DOM, AJAX, etc.
For example, a cookie named PHPSESSION is generated by server http://example.com. Assume you are hosting the server 'http://www.attacker.com', you can't get the DOM data 'PHPSESSION' in http://example.com .Switching origins:
JS provides a way to change origins if certain conditions are met.
Domain: http://attacker.example.com/ Target: http://victim.example.com/document.domain='example.com'; ->By setting document.domain, all of the DOM data in the current page will be shared in the scope of *.example.com.
This change allowed when the current page is the subset of the main domain.
If the current page isn't the subset of the main domain, an error message will be shown in the console log.
- Quirks with Internet Explorer
It skips the policy checks in the following situation: - The origin falls under the Trust Zone. e.g. internal corporate websites.
- IE doesn't give any importance to port number. e.g. port 8081 and port 8080 can be considered as the same origin.
Possible bugs:
1. SOP bypass in IE for the port number.
2. An SOP bypass in Firefox abusing the PDF reader. (CVE-2015-4495)
https://cve.mitre.org/cgi-bin/cvename.cgi?name=CVE-2015-4495
Cross-domain messaging
Sometimes, there exists a need to communicate across different origins.
Cross-domain messaging(CDM) allows sending messages or data across different origins.AJAX and the same-origin policy
AJAX allows the browser to silently exchange data with the server without reloading the page.
AJAX works using the XMLHTTPRequest() method of JS.
XMLHttpRequest:XMLHttpRequest (XHR) is an API in the form of an object whose methods transfer data between a web browser and a web server.
CORS(Cross-Origin Resource Sharing)
CORS allows cross-domain HTTP data exchange, which means a page running at origin A can send/receive data from a server at origin B.
'Access-Control-Allow-Origin' will allow Cross-Origin Resource Sharing.
e.g.
Access-Control-Allow-Origin: *.example.com
Access-Control-Allow-Methods: OPTIONS, GET, POST
Access-Control-Allow-Headers: X-custom
Access-Control-Allow-Credentials: true

A note for reading 'Practical Malware Analysis', Chapter 0
* Chapter 0
The Goals of Malware Analysis: Providing the information we need to respond to a network intrusion.
Malware analysis can be used to develop host-based and network signatures.
Host-based signatures
They are used to detect malicious code on victim computers.
Malware indicators focus on what the malware does to a system rather than the characteristics of the malware itself.
Network signatures
They are used to detect malicious code by monitoring network traffic.
Signatures created with the help of malware analysis are usually far more effective, offering a higher detection rate and fewer false positives.
Malware Analysis Techniques
Basic Static Analysis
Examining the executable file without viewing the actual instructions.Basic Dynamic Analysis
Running the malware and observing its behavior on the system in order to remove the infection, produce effective signatures, or both.Advanced Static Analysis
Advanced static analysis consists of reverse-engineering the malware’s internals by loading the executable into a disassembler and looking at the program instructions in order to discover what the program does.Advanced Dynamic Analysis
Advanced dynamic analysis uses a debugger to examine the internal state of a running malicious executable.
Types of Malware
- Backdoor
- Botnet
- Downloader
- Information-stealing malware: sniffers, password hash grabbers, keyloggers
- Launcher
- Rootkit
- Scareware
- Spam-sending malware
- Worm or virus
Malware can also be classified based on the target scale. e.g. Mass malware, targeted malware.
Targeted malware is a bigger threat than mass malware.
General Rules
XSS Mindmap
Source:
AwesomeXSS/Database at master · s0md3v/AwesomeXSS · GitHub
Payload:
* polyglot:
gist.github.com